9.4 KiB
User Guide
Configuring VPNaaS service -------------------------
Once OpenStack has been deployed, we can start configuring VPNaaS.
This section provides an example of configuration and step-by-step instructions for configuring the plugin.
Here is an example task. Let’s imagine that we have 2 Clouds, Public and Private (Cloud A and B). Each cloud has a Project with a private network which is connected to the Internet via router. In real life, Private networks are very often placed behind the NAT just like in our case.
Project:

In this network topology, we have a public Cloud A, directly connected to the real public network and private Cloud B, connected to the corporate private network and placed behind NAT (Bastion router).
Let’s get started.
Please, note the following when configuring VPNaaS plugin:
This is important for setting up VPNaaS, since router gateway IP addresses and other settings made to configure the VPN connection are only visible to the user who has an admin role.

Once your VPN is connected, you’ll probably want to use a range of apps and methods to communicate across it. So, you need to be aware that every Project in OpenStack is assigned the default security group for the cluster in its default form, which is usually restrictive. So you’ll probably need to create a few additional rules in each Project’s default security group: like a general ICMP rule, enabling pings, and a port 22 TCP rule, enabling SSH.

Configure VPNaaS on Cloud A
Let’s configure VPN. To do that, please select Network option in the left-hand menu and click VPN.

Create IKE Policy
Enter KE Policies tab and click Add IKE Policy button (see the screenshot above).
We would recommend that you changed the Encryption algorithm, which should be set to aes-256 and IKE version which should be v2.

Create IPsec Policy
Enter IPSec Policies tab and click Add IPSec Policy button (see the screenshot in step 1 of this section).
The defaults are fine, though it’s recommended to use aes-256 encryption. Please pay attention that we should keep tunnel Encapsulation mode, because this mode allows to build tunnel between 2 private networks over public (transport is used only for the host-to-host VPN connection) and esp Transform protocol which provides encryption for the payload data.

- Create the VPN Service.
-
Enter VPN Service tab and click Add VPN Service button (see the screenshot in step 1 of this section).
Here select a router that will work as our VPN gateway — that’s the local router; You should also pick up a subnet to make visible at the other end: that’s our local subnet. As noted, the main thing to remember is that VPN will not work if the subnets at both ends overlap

Create IPSec Site Connection.
Enter IPSec Site Connection tab and click Add IPSec Site Connection button.
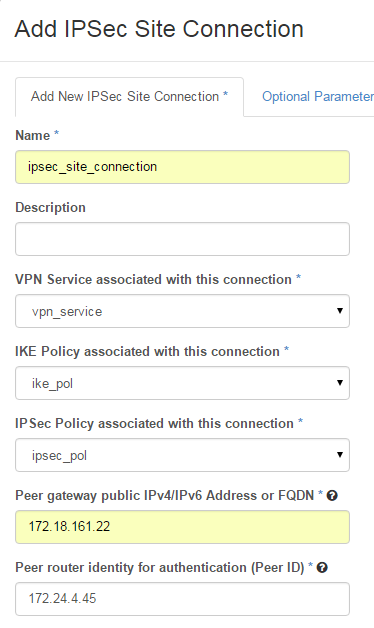
This is the only mildly-tricky thing about setting up a VPN using VPNaaS. We start by identifying our VPN Service, our IKE Policy and our IPSec Policy, defined just a moment before — that’s easy.

To finish, however, we’ll need to get some information about the network architecture in Cloud_B. Cloud_B has the Bastion, which is connected to the public network and also is used as NAT for the corporate network. For the building VPN connection through the NAT, IPSec has NAT-Traversal mechanism which is enabled by default.

So let’s flip to Project_B’s Horizon, making sure we’re logged in as the admin, so we can see the info we need to know. Here we need to specify Bastion’s public IP address in Peer gateway public IPv4/IPv6 Address or FQDN slot (see step 5):

Further we specify Peer gateway public IPV4 address or fully-qualified domain name for Project_B’s router. This can be found by going to Project_B’s Network tab, clicking on Router_B, the router name, and copying the IP address shown for the External gateway interface: in our case, it’s 172.24.4.45. This is the thing you won’t be able to see if you’re not in the admin role for this project.

This IP address goes into Peer router identity for authentication(Peer ID)* slots in the IPSec Site Connection edit dialog for Project_A (see step 5):
The second piece of info is the CIDR range for Project_B’s subnet. Again, go to Project_B’s Horizon, click the Network tab, click on network, and copy the subnet CIDR range, which is 22.0.0.0/24.
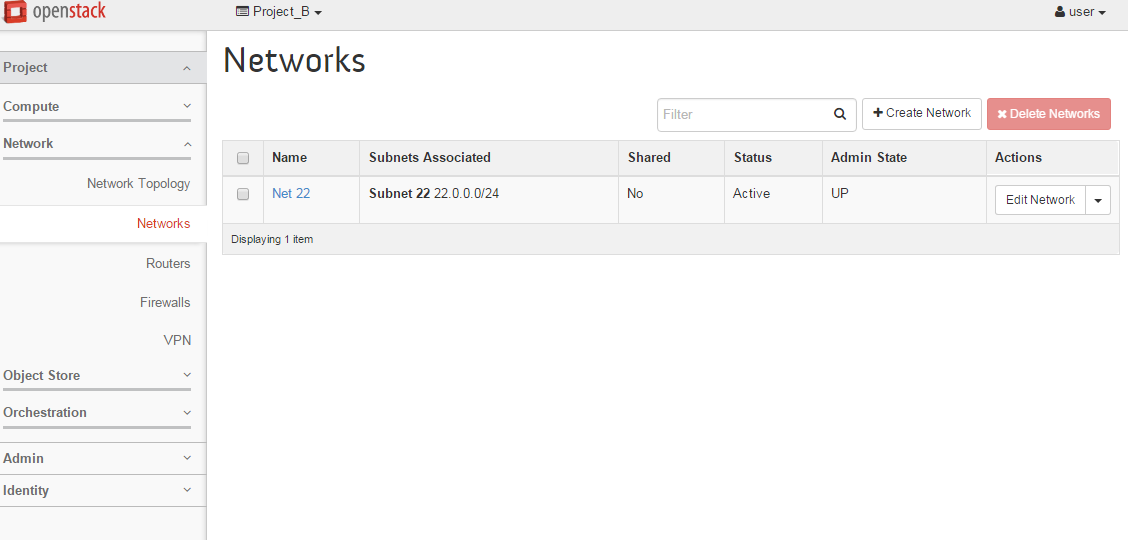
We’ll put that into the Remote Peer Subnet slot on Project_A’s IPSec Site Connection dialog. Then to finish setting up Project_A’s IPSec Site Connection, we’ll provide a pre-shared key password — same on both sides — for authentication. The rest of the parameters can be left as defaults — if you change them, they should match on both sides of the connection (see step 5):

Configure VPNaaS on Cloud B
Now let’s quickly set up the other end of the VPNaaS connection, over on Project_B. We’ll make sure protocol details and policies match.
On Project_B’s PSec Site Connection tab, we’ll provide — in two places — the peer gateway public IP address for Project_A’s router and subnet IP address range.
Now we set up the same components on Project_B. Setting up IKE Policy, IPSec Policy and VPN Service are simple. For the IPSec Site Connection, we’ll need the same two pieces of info from Project_A that we needed for Project_B. Here, we’re grabbing Project_A’s external router IP address.

And here, we’re grabbing Project_A’s local network IP address range.

Create Sec Site Connection
Since Cloud_A is connected to the public network directly we just drop the router IP into two slots of Project_B’s IPSec Site Connection dialog, and supply the Pre-shared password.
Then we click Add, and the VPN sets itself up.

Once you click Add on the IPSec Site Connection tab, you’ll have to wait a little bit for your VPN to go to Active status (see Status column in the IPSec Site Connections tab). If that doesn’t happen within a few minutes, there’s probably something wrong with your settings. If this happens, check to make sure that protocol details on both sides match, that correct router gateway and subnet address range info for each side has been provided in the other side’s IPSec Site Connection tab, that PSK passwords match, and that subnet IP address ranges don’t overlap. We’re connected! The IPSec Site Connection shows as Active at both ends.

Testing connectivity
Let’s open console of VM A on the Cloud_A,log into and try to ping VM B using their internal (not public) IP addresses.

Then do the same from console of VM B.

So it works!!! Now we have VPN connection between 2 private networks Net_70 (placed in Cloud_A/Project_A) and Net_22 (placed in Cloud_B/Project_B) and the virtual machines connected to these networks have secure direct connectivity.