21 KiB
Test Plan for SwiftStack Fuel Plugin
Revision history
p{2.5cm}p{5.6cm}|
| Version | Revision Date | Editor | Comment |
|---|---|---|---|
| 1.0 | 27.08.2015 | Charles Hsu(chsu@swiftstack.com) | Created |
| 2.0 | 06.07.2016 | Charles Hsu(chsu@swiftstack.com) | Revised for Fuel 8.0 |
| 2.1 | 06.15.2016 | Charles Hsu(chsu@swiftstack.com) | Update contents and rewrite in RST |
SwiftStack Fuel Plugin
Allow Mirantis OpenStack environment able to use an existing Swift cluster managed by SwiftStack Controller. SwiftStack plugin will disable the swift cluster deployed in the nodes are role Controller or Primary-controller. And then reconfigures API endpoints, keystone and glance settings to point an existing SwiftStack Swift cluster.
Here are two basic Fuel OpenStack environments as follows:
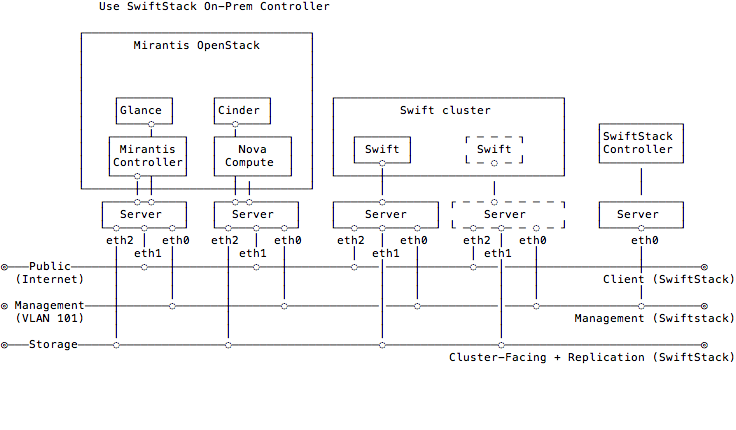
Use SwiftStack On-Premises Controller
Please setup an On-Premises SwiftStack controller first, and then setup a single node Swift cluster with SwiftStack controller, here is our quick start guide.
- 1 SwiftStack On-Premises controller
- 1 Swift cluster (single node)
Also prepare a Fuel environment using Slave nodes according to the Fuel Install Guide.
Note
In this diagram, the Swift cluster is also connected to Fuel Storage network for SwiftStack cluster-facing and data replication network, if you have performance concern, please consider to separate Swift cluster-facing and data replication network out of Fuel networks. That prevents network starvation on Fuel Storage network when Swift service daemons are moving data or clients upload large data into the Swift cluster.
Also, SwiftStack Nodes need to communicate with the On-Premises controller over Fuel Management network, so please make sure the On-Premises controller also connected to Fuel Management network. You can run a CLI command
ssdiagon SwiftStack nodes to check the connectivity between SwiftStack Nodes and Controller.
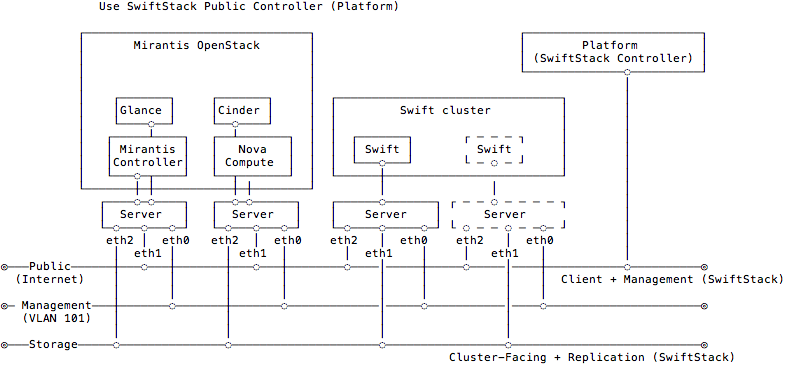
Use SwiftStack Public Controller (Platform)
Please setup a single node Swift cluster with our public controller, here is our quick start guide.
- 1 Swift cluster (single node)
Also prepare a Fuel environment using Slave nodes according to the Fuel Install Guide.
Note
In this diagram, the Swift cluster is also connected to Fuel Storage network for SwiftStack cluster-facing and data replication network, if you have performance concern, please consider to separate Swift cluster-facing and data replication network out of Fuel networks. That prevents network starvation on Fuel Storage network when Swift service daemons are moving data or clients upload large data into the Swift cluster.
Also, SwiftStack Nodes need to communicate with SwiftStack Public controller over Fuel Public network, so please make sure SwiftStack Nodes able to reach Internet.
Developer’s specification
See developers specification in this repository: https://github.com/openstack/fuel-plugin-swiftstack
Limitations
The plugin only supports a running SwiftStack Swift cluster and it able to reach from the OpenStack environment. Make sure you have the correct network configuration for the Swift cluster and Mirantis OpenStack environment before you enable this plugin.
Test strategy
Types of tests included
- Check Swift API endpoints
- Basic Swift APIs operations
- System Tests
Types of tests not included
- Swift cluster operations
Acceptance criteria
These tests should be pass:
- Check Swift API endpoints
- Basic Swift APIs operation
- System Tests
Test environment and infrastructure
Before install the plugin to your fuel environment, make sure you have a running SwiftStack Swift cluster managed by SwiftStack Platform controller or On-Premises controller. You’ll need to configure few middlewares from the controller and push configuration to the SwiftStack cluster.
- A running SwiftStack Swift cluster
Product compatibility matrix
p{7.6cm}|
| Issue | Version |
|---|---|
| Mirantis OpenStack | 8.0 |
Check Swift API endpoints
Swift API endpoint should be like http[s]://<SWIFT_API_IP_or_HOSTNAME>:[80|443]/v1/KEY%(tenant_id)s
- Disable TLS with Swift endpoint
- http://<SWIFT_API_IP_or_HOSTNAME>:80/v1/KEY%(tenant_id)s
- Enable TLS with Swift endpoint
- https://<SWIFT_API_IP_or_HOSTNAME>:443/v1/KEY%(tenant_id)s
##
## Correct OS_AUTH_URL, append ‘v2.0’ in the end of line
##
~$ export OS_AUTH_URL='http://192.168.0.2:5000/v2.0'

~$ keystone endpoint-list |grep KEY
| b858f41ee3704f32a05060932492943b | RegionOne |
http://172.16.0.100:80/v1/KEY_%(tenant_id)s |
http://172.16.0.100:80/v1/KEY_%(tenant_id)s |
http://172.16.0.100:80/v1/KEY_%(tenant_id)s |
19966ec76f0d455d94caa87d9569a347 |
Basic Swift APIs operation
Verify Swift account with Keystone authentication.
# Login to one of nodes of Swift cluster.

# Test admin account
root@node-23:~$ cat rc.admin
export ST_AUTH=http://192.168.0.2:5000/v2.0
export ST_USER=admin:admin
export ST_KEY=admin
export ST_AUTH_VERSION=2

~$ source rc.admin

~$ swift stat
        Account: KEY_8408a5a799364d06b81542a8017e7975
     Containers: 0
        Objects: 0
          Bytes: 0
X-Put-Timestamp: 1465289155.00899
    X-Timestamp: 1465289155.00899
     X-Trans-Id: tx1d35d328e5294c88baf5e-00575689c2
   Content-Type: text/plain; charset=utf-8
Upload/download object and check md5sum
~$ swift upload test rc.admin
rc.admin

~$ swift stat test rc.admin
       Account: KEY_8408a5a799364d06b81542a8017e7975
     Container: test
        Object: rc.admin
  Content Type: application/octet-stream
Content Length: 117
 Last Modified: Tue, 07 Jun 2016 08:46:16 GMT
          ETag: 4a97d36410af1b380fe5b014a6cd8db5
    Meta Mtime: 1465288847.821181
 Accept-Ranges: bytes
   X-Timestamp: 1465289175.47789
    X-Trans-Id: tx13823ad38c084e529c20d-00575689de

~$ swift download test rc.admin -o rc.admin.download
rc.admin [auth 1.171s, headers 1.452s, total 1.460s, 0.000 MB/s]

~$ md5sum rc.admin*
4a97d36410af1b380fe5b014a6cd8db5  rc.admin
4a97d36410af1b380fe5b014a6cd8db5  rc.admin.download
System testing
Install plugin and deploy environment
p{13cm}|
| Test Case ID | install_plugin_deploy_env |
| Steps | #. Copy the plugin to the Fuel Master node #. Install the plugin. #.
Ensure that plugin is installed successfully with running
fuel plugins --list command in the Fuel CLI. #. Create an
environment with enabled plugin in the Fuel Web UI. #. Add 3 nodes with
Controller role and 1 node with Compute and Cinder role. #. Finalize
environment configuration (e.g. networking, nodes interfaces). #. Run
network verification check. #. Deploy the cluster. #. Run OSTF. |
| Expected Result |
|
Install plugin and deploy environment with Swift API hostname
p{13cm}|
| Test Case ID | install_plugin_deploy_env_with_swift_hostname |
| Steps | #. Copy the plugin to the Fuel Master node #. Install the plugin. #.
Ensure that plugin is installed successfully with running
fuel plugins --list command in the Fuel CLI. #. Create an
environment with enabled plugin in the Fuel Web UI. #. Add 3 nodes with
Controller role and 1 node with Compute and Cinder role. #. Finalize
environment configuration (e.g. networking, nodes interfaces). #. Run
network verification check. #. Enabled Swift API hostname in the plugin
section #. Deploy the cluster. #. Run OSTF. |
| Expected Result |
|
Modifying env with enabled plugin (removing/adding controller nodes)
p{13cm}|
| Test Case ID | modify_env_with_plugin_remove_add_controller |
| Steps | #. Copy the plugin to the Fuel Master node #. Install the plugin. #.
Ensure that plugin is installed successfully with running
fuel plugins --list command in the Fuel CLI. #. Create an
environment with enabled plugin in the Fuel Web UI. #. Add 3 nodes with
Controller role and 1 node with Compute and Cinder role. #. Finalize
environment configuration (e.g. networking, nodes interfaces). #. Enable
the plugin and configure it following the instructions from the Plugin
Guide. #. Run network verification check. #. Deploy the cluster. #. Run
OSTF. #. Remove 1 node with Controller role #. Re-deploy the cluster. #.
Run OSTF. #. Add 1 new node with Controller role. #. Re-deploy the
cluster. #. Run OSTF. |
| Expected Result |
|
Modifying env with enabled plugin (removing/adding compute node)
p{13cm}|
| Test Case ID | modify_env_with_plugin_remove_add_compute |
| Steps |
|
| Expected Result |
|
Fuel create mirror and update (setup) of core repos
p{13cm}|
| Test Case ID | Fuel_create_mirror_update_core_repos |
Steps |
#. Copy the plugin to the Fuel Master node #. Install the plugin.
#. Ensure that plugin is installed successfully with running
|
| Expected Result |
|
Uninstall of plugin in the deployed environment
p{13cm}|
| Test Case ID | uninstall_plugin_with_deployed_env |
Steps |
#. Copy the plugin to the Fuel Master node #. Install the plugin.
#. Ensure that plugin is installed successfully with running
|
| Expected Result |
|
Uninstall of plugin in the non-deployed environment
p{13cm}|
| Test Case ID | uninstall_plugin |
| Steps | #. Copy the plugin to the Fuel Master node #. Install the plugin. #.
Ensure that plugin is installed successfully with running
fuel plugins --list command in the Fuel CLI. #. Add 3 nodes
with Controller role and 1 node with Compute and Cinder role. #.
Finalize environment configuration (e.g. networking, nodes interfaces).
#. Enable the plugin and configure it following the instructions from
the Plugin Guide. #. Run network verification check. #. Delete listed
environment #. Uninstall the plugin with running
fuel plugins --remove <plugin-name>==<plugin_version> (e.g. 1.0.1)
for more details. #. Install the plugin. |
| Expected Result |
|
Apply maintenance updates to deployed environment
Mirantis OpenStack features the ability to receive patches via the common flow called Maintenance Updates. Please reach out to Partner Enablement team about the latest Maintenance Updates portion to test against with you plugin.
p{13cm}|
| Test Case ID | apply_mu |
| Steps |
|
| Expected Result |
|
Appendix
p{14cm}|
| # | Resource title |
|---|---|